5 Superbly Creative Things to Do When You Feel Bored & Run Out of Internet
Have nothing to do? Make your boredom a meaningful experience by doing these creative things. Try now!
This is the internet era, and we don’t get bored. Right? But have you ever thought about what to do when there is no internet? Or what will you do when you wouldn’t have any other thing to do? Well, why to get bored when there are many great things to do. Yes, we are talking about creative things you can do in your spare time and fill your soul with happiness.
You can do many DIY activities like creating piggy banks, stylish bow clips, or toy cycle for your kids and yourself too. And, guess what you don’t need to be a professional artist to be creative because there are several creative ways to get creative; you only need to follow them. So, painting and craft are always there to help you; all you need is a few new business ideas to implement.
What if you want to design or make something but don’t have any new, unique and amazing idea to do or you are confused about where to start.
So, here we are with a list of amazing activities that you can do right at home, even without going anywhere or inventing something.
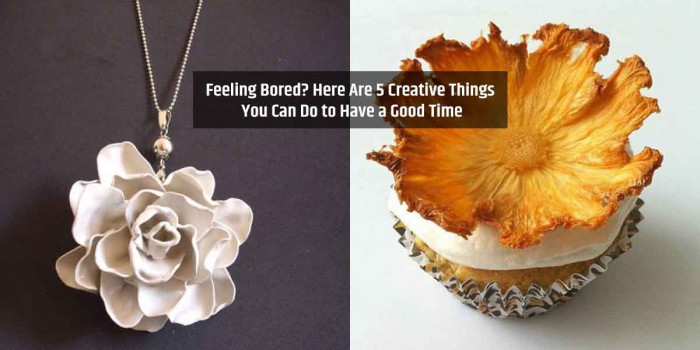
1. Make Dried Pineapple Flowers
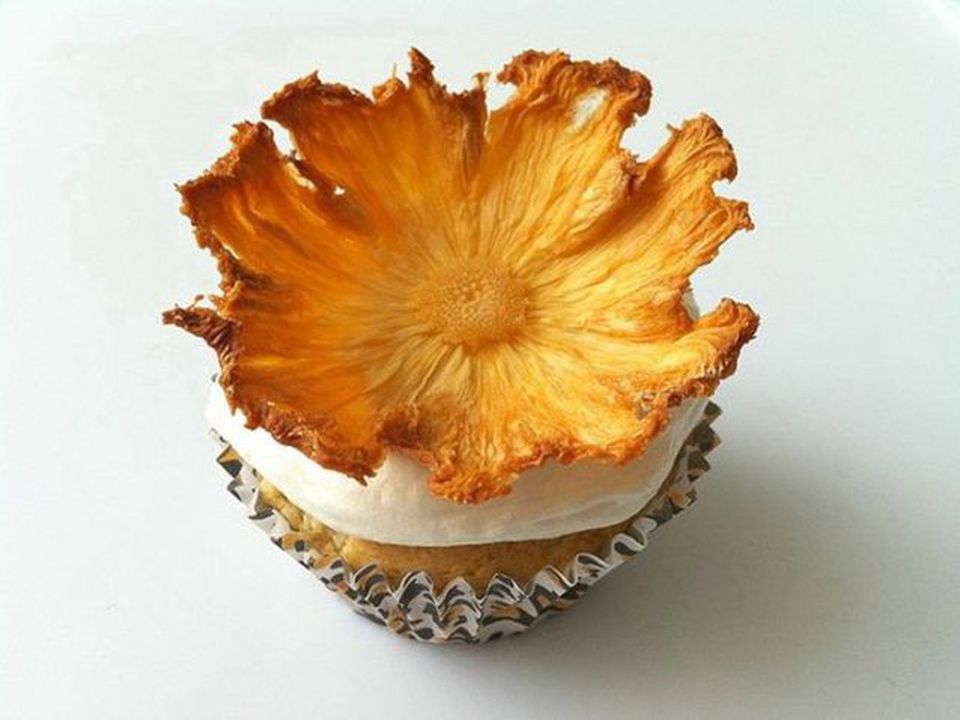
If you are a chef or love cooking new things, then this could be one creative food hack you can try. To do, start by slicing off the top and bottom of the fruit with a large sharp knife. Try cutting off the rind of your fruit.
Also, carefully pluck out any of the eyes or seeds that remain. Well, most of the vegetable peelers possess a special little point for things like this, or use a small paring knife or measuring spoon to do it.
Now slice off the fruit in a very thin manner so that the slices are almost translucent. Further, arrange all the pieces on a baking sheet lined with a silicone baking mat or parchment paper. The process begins now, as to dry them out, you bake them at 225 ̊ F slowly. A good starting point is 30 minutes, flip, and then 30 more minutes; however, timing may vary.
Must say that for better results, keep a close eye on them. To speed up the process and deepen the color: you can also increase the temperature slightly, but if you do, be very careful to avoid burning them.
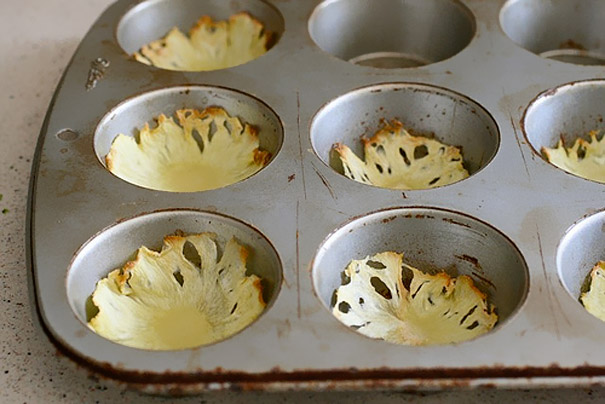
Now it's almost ready. Yes, check once if the slices are shrunken and almost completed dried out. Once ready, transfer them to a muffin tin so that the edges curve upward in flower shape. You can also let them sit overnight this way to retain the flower shape.
2. Make Roses from Maple Leaves
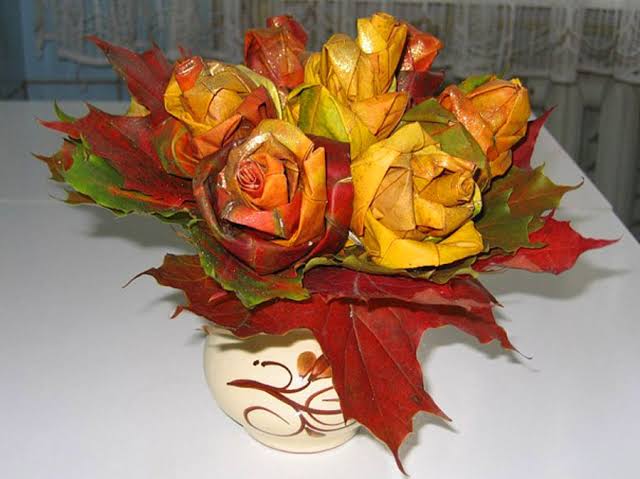
Autumn leaves are nothing less than a treat to eyes. And in every fall, you can do this trick. Here we are making talking to make a golden autumn bouquet.
Well, the first thing to do is to collect the leaves. Make sure that too small, sick, dry, and torn leaves will NOT look good in the bunch. Also, try to use different color leaves for more beautiful flowers. Plus, keep in mind that it is better to choose the leaves of the same color for one flower.
Start by taking one leaf and fold it in half across the central vein so that the front side is outside. And now, you need to turn this folded sheet into a tight roll, and this part will be the core of the future rose. Then you can try covering this core by arranging the petals continually manner.
To start the work, take any leaves and place a core in its center. Make sure that the front side of the leaf is inside the flower! And then bend this leaf outward in half. To be more specific, you can keep the edge of the bend a centimeter in length and a half above the core.
Then further, the protruding edge is also bent outward. Keep in mind that the bend is no longer smoothed out. Hence, now you need to wrap the side edges of this double-folded sheet from two sides around the core. For that, you can pinch the lower edges of the leaf at the very base of the flower. Then take the new leaf for the next "petal" and repeat the same method just performed; only make sure that this time the petal is located on the side opposite to the first sheet.
And, you need to repeat the same process for several stages of the flower making with other many petals collected in a bud. You can add many you want until you find it sufficient. Then if you feel the bud is ready, tie its base with threads to fix the flower. Again how many flowers will be in your bouquet is up to you. Like here, we have made three.
Further, you can use "greens" to cover all three flowers like in the image. You can use the most variegated leaves for this. It is better to iron the leaves in advance between the newspaper sheets so that these leaves do not curl into a tube the next day when dried. Make sure that careful handling will not damage them as they will become more fragile.
Now, this is the final step. So continually, lay these leaves circularly under the buds and fix the now ready-made bouquet with the same threads.
On the other hand, you can tie this knot on top of the thread with yellow paper tape (masking tape); this will help you to hide the threads to make it look better and neater and guess what you are done. Yes, here is the ready autumn bouquet.
3. Make Your Own Rose Pendant
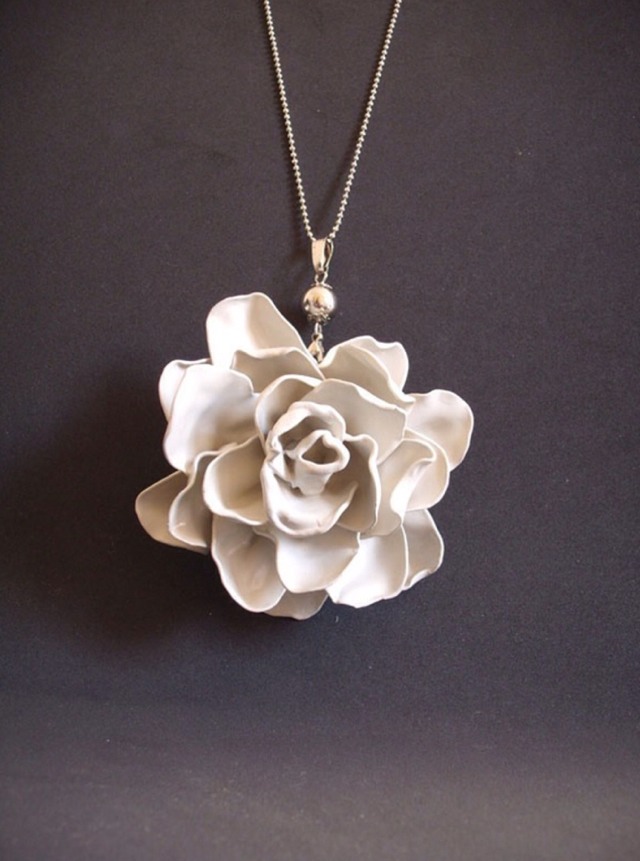
Let’s learn to make a rose pendant of plastic spoons in several steps:
Step 1
At the very first, you can choose any color spoon you want to make stuff of or also you can spray paint them afterward, once you are done.
To start, cut off the handles of all spoons using scissors, cutter anything you want. But try to use scissors for more clarity. Make sure that you will need near about 17 spoons; 5 for petals around, 10 for outer petals, and the 2 in the middle.
Step 2
Another thing you will be needing is a candle. So start by lighting the candle. Then take your needle nose pliers to hold the spoon because it won’t be easy to hold the spoon with hands. Moreover, make sure that you do not keep the spoon too close to the flame as it will begin the blackening of the plastic.
Further, melt the bowl of the spoon and then heat the underside. Then let it get cool down a bit, but while it's still warm and bendable, shape the petals by pulling the tip and bending it backward with either with your fingertips or by pliers. Alternatively, you can also speed up the cooling down by blowing.
And, you need to repeat this for all 17 petals.
Step 3
Now when you are done with that, it’s time you begin with the next ten spoons for outer petals. First, take two spoons and melt what's left of the handles. Then place them next to each other by fusing, and until the handles stick together, smooth out the melt. And, since the melted plastic is incredibly hot, you could use the needle-nose pliers to do this.
Now repeat the whole procedure for at least four times so that you have around five sets of 2 petals. Further, melt the handles of 2 sets and stick them together. And, until you have the three pieces of the rose, repeat this step.
Now, if you are thinking of assembling all the pieces, then wait for a moment because it will take a while to figure out the right way of doing that.
Step 4
At last, glue the pieces together either by melting the bottom side of the petals or a glue gun.
You can do that by inserting the five petals into the ten petals and the two middle petals into the 5.
So, as you can see that your rose is finished, now melt the bottom of the rose. Then to melt the plastic again, push a safety pin into it and secure by laying a small piece of melted plastic over the safety pin once it is flat enough.
Now, hang the pendant onto a long jewelry chain.
4. Toilet Paper Roll Wall Art
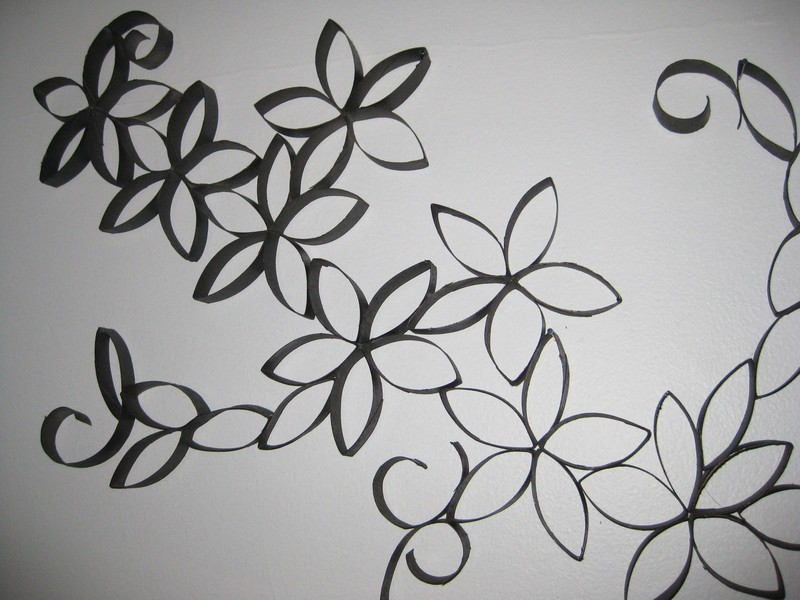
We all use Toilet Paper, but have you ever thought of using it creatively? Yes, you read it right! We are talking about Toilet Paper Roll to make your place look beautiful. Let’s see steps and give a creative touch to an ordinary thing we all use in daily life.
Stuff You Need:
a. Toilet Paper Rolls
b. Glue Scissors
c. Spray Paint
d. Bobby Pins
Step 1
At first, gather all the stuff you need for this project. Here we have used plain old toilet paper rolls, glue, and a brushed metal appearance spray paint.
Step 2
Now crush the toilet paper roll in half, and cut it into many parts equally. If you like, you can measure or estimate the size based on the look you want. Like in this project, each toilet paper roll consists of 6 "petals."
Step 3
Until you've got tons of these, keep cutting, as it is the basic unit for your piece.
Step 4
Now start sticking the "petals" together in an arrangement. Make sure you do that based on what kind of pattern you're going for.
Step 5
To hold the pieces together, you can use bobby pins or any clip would work too because it will give the glue between each segment a chance to dry while you continue gluing.
Step 6
You can see that the 5-petal flower shape was the basis of this piece. As a tip, make sure that after you made a bunch, glue them all together in a pattern you like, and also add a few other Viney/leafy looking segments here and there.
Step 7
Once you're done with arranging the patterns, be happy with how your piece looks, and take time for spray paint! Here we have used metal finish paint, but any color will do!
Step 8
You can match from the picture if the patterns look similar from the picture, though wait until it dries.
Keep in mind that you don’t need to spray paint every piece individually, as we had done this for an example only. So, when you make the wall art, glue the entire thing together first, and then paint it as a whole.
Step 9
And guess what you're done! Yes, now you can hang your new wall art wherever you like. Finally, stand back and admire.
5. Make Your Shoe Fun
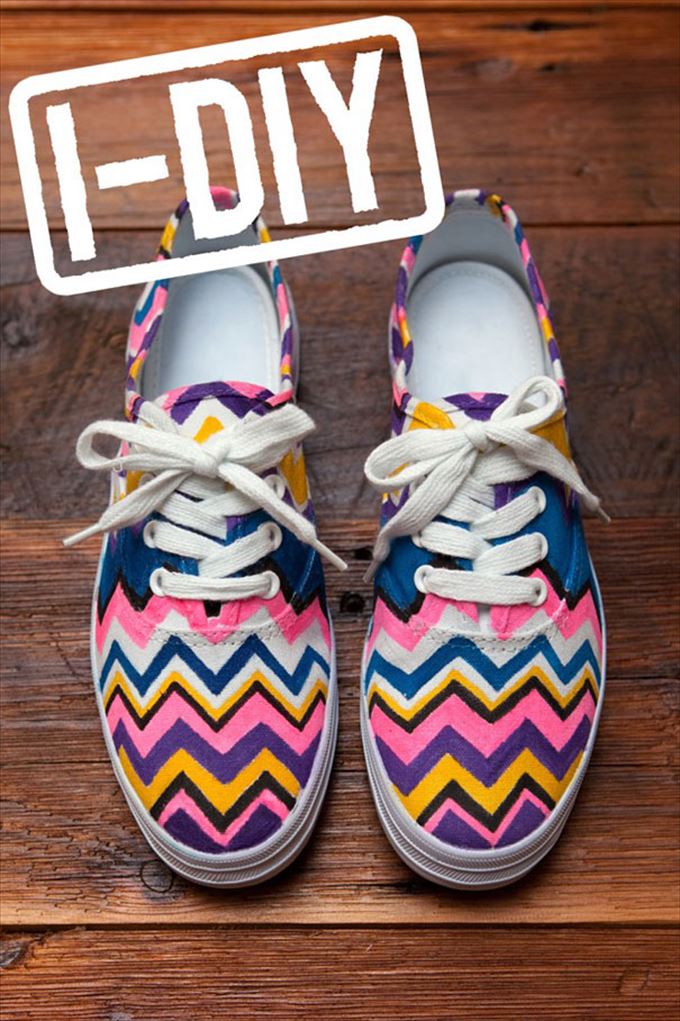
You may have heard of ideas for giving a creative makeover to your phone case. But, have you ever thought of giving a makeover to your boring white shoes with simple shoe hacks? Well, this one is my favorite. Yes, make your white shoes colorful and fun by following these simple steps.
Stuff You Need:
a. A pair of white canvas sneakers
B. Stiff paper
c. Ruler
d. Scissors
e. Pencil
f. Fabric markers in various colors (try if they are with both a thick and thin tip, which will be the best)
Step 1
At the very first, use the ruler, draw a straight line near the edge of the stiff paper you are using.
Step 2
Now make a second line a half-inch below from the first one. And, again use the ruler to make tick marks at every half-inch interval on both lines.
Step 3
Next, by connecting every other tic, create a zig-zag pattern inside the two parallel lines.
Step 4
As you've just made all of these triangles, just cut away the lower row of them. Cut it is a way so you will be left with what looks like a row of teeth at the bottom of the paper. An additional tip, if you want to create a shark or bear costume for Halloween, feel free to use this template.
Step 5
So, now you are ready to start the process. Hence take out your plain canvas shoes and also remember to remove the laces as you don't want to color them for sure.
Step 6
Now position the paper onto the toe side of the sneaker. It will be better if you'll be working your way from the front to the back of the shoe. We felt it was easier to keep things lined up by having the point of one triangle in the center of the shoe, but still, you can position the template wherever you like it best.
Step 7
Further, trace another row of triangles by moving the template back, make sure all of the points more or less match up with the previous rows.
Also, vary the spacing of the template to get a great patterned look — however, there's no right and wrong with this, so feel free to have any pattern. Here we are making one giant row followed by lots of thin rows, followed by a medium and small row, and so on.
Make your pencil markings very light, so it doesn't show through the marker!
Step 8
And, this is how the fun begins. Take your fabric markers and start coloring in the rows. Try one thing that each row is a different color. Well, here we must say that is no specific pattern to arrange these leaves, so do it the way you want it. And also, feel free to switch the colors betweens rows as much as you'd like. Use the thin edge to outline the rows if your markers have differently sized tips, and the thick to fill them in.
Another tip to keep in mind is to try coloring every other row so the dye has a little time to dry, as even fabric markers can bleed a little bit. Plus, go back and fill in the rows you left out after a few minutes. Also, use some masking tape around the shoe sole if coloring in the lines is something that's troubled you since pre-K and even to outline the rows, so everything stays orderly.
Step 9
Also, make sure you color the inside rim of the sneaker, so your kicks look extra-polished. And, as you've already come all this way, so why to skimp out on this step.
Keep in mind that you color all of the crannies and nooks because you may already know, it is where the seams of the sneaker meet. We said this because when you're in the coloring zone, these spots can easily get missed, so check for any white spots by going once more!
Step 10
After you are done with all these steps, it's time to color the tongue of the sneaker. Since it's hard to get a good angle, this part can be a little awkward, but don't worry, you don't have to be too accurate on this part since you only see a little bit of the tongue. Just color the parts you can see and do your best while trying to match the patterns and colors from either side of the shoe.
Step 11
So, now the work is done. Just lace up the sneakers and take them for a test drive! Beware that your friends are going to be so enamored with your skills, and this is for sure that they will try to ask you to make them a pair. Help yourself!
Final Words
So, we have seen five unique and creative things to do to keep the boredom away. Well must say that Being creative isn’t something you need to be born with. Give it a shot because it just needs to be something you want to explore. What if, while doing all this, you find that you’re a lot more creative than you thought.
These are just five ideas, and we are very sure that there are many more awesome DIY ideas that we’ve missed. So if you know some creative things to do when bored or have done a cool crafting project yourself, feel free to share it in the comments!
Popular Posts
9 Most Popular Poem on Perseverance
Poems are a way to express feelings in the form of verse. Some poems are written in such a way that tells us where we are and wh...
Augustus Perez
These 13 Paintings Convey Deep Meanings In The Most Extraordinary Way
Pictures speak a thousand words for those who understand its language. But an art that depicts the same is rare to confront. Fre...
Swati Bhandari
Phoenix Bird And Its Popular Culture Adaptations
In Greek mythology, the Phoenix is a creature that resurrects from its ashes after it has ceased to exist in a show of flames. I...
Kevin Green