DIY Guide to Make a Beautiful Flower Vase Using Popsicle Sticks
Do you love doing creating stuff? If you do, here’s a cool DIY guide for making a beautiful flower vase using popsicle sticks all by yourself!
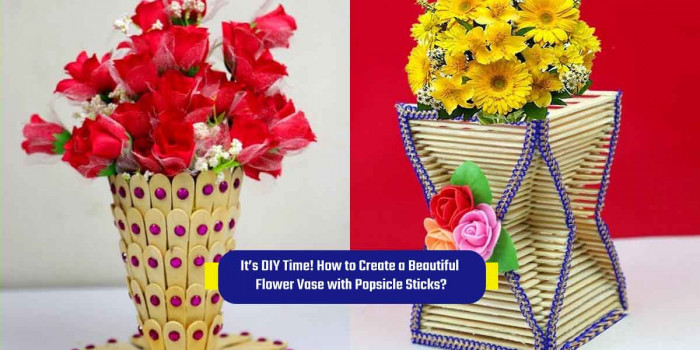
Have you been thinking of engaging in a creative activity or decorating your space? This DIY guide has you covered! Here we are going to tell you how to make a beautiful Popsicle stick flower vase. It would beautify your home.
You don’t need to spend too much money. This is inexpensive as you can easily find most of the things you would need at your home itself. And if you are a parent, you should consider making this with your kid as he or she would surely enjoy this learn-by-fun DIY activity.
Let’s know the things you would need and the steps to make the popsicle stick flower vase.
Things You Need:
1. Tape
2. Flowers
3. Popsicle Sticks
4. Glue gun or Glue stick
5. A Pair of Scissors
Besides these, you might need some tools like a ruler and pencil. So keep them handy!
Step-by-Step Guide to Make a Stick Flower Vase:
1. Creating the Base of the Vase
Begin by placing three popsicle sticks to form a triangular shape. Tape the three vertices (You could also glue them, but the sticks may slide and disturb the perfect shape). Make another triangle using the popsicle sticks and place it over the previous one such that they form a star.
Tip: For perfect symmetry, use a pencil and ruler to mark the center of each triangle’s side. Place the triangle over another symmetrically to form a star shape. It would create a perfect hexagon and thus helps make a perfect base.
2. Making a Perfect Star
When making a perfect star (hexagon in the interior), do mark lines on both sides of each stick. It is needed, as when you apply glue, it may prevent you from creating the perfect star shape. Apply glue in the marking position, and once it dries, remove all the tapes. Your base is now ready!
It is the first layer of the craft and serves as the foundation. So be extra careful!
3. Make and Add Outer Layers
Add new outward layers (let’s make it 12-layered) over the base. For every new layer, you need to make a triangle. The triangles’ size increases as you create the higher layers. It would make the structure more symmetrical. When you reach the 12th layer, your bottom portion of the flower vase is complete.
4. Make and Add Inner Layers
Place sticks in inner direction over the bottom structure created in step 3. For every need layer (let’s make it 15-17 layered), you need to make a triangle. And in this case, the triangles’ size decreases as you go towards higher layers. And this gives us our top layer.
5. Add Layers Above Top Layer
Now, you need to add 6-7 outward layers above the top layer made in step 4. Trace the underneath layer, as mentioned earlier.
6. Add Upper Layers
Keep popsicle sticks in the upper direction above the bottom layer. The upper layers mean placing the sticks one above the other with no inward or outward movement. Repeat the process until you make six upper layers.
7. Put Flowers Inside the Basket
Arrange the flowers of your choice inside the vase. Doesn’t it look beautiful? Now keep this flower vase on the table or anywhere you like.
Concluding Words
So now you’ve learned to make a flower vase using the popsicle sticks. And if you’re into making creative DIY stuff, you can try out this DIY toy cycle or also make different DIY stuff using CDs.
We hope you’ve enjoyed creating this DIY flower vase with popsicle sticks & it took you back to your childhood days!
Popular Posts
9 Most Popular Poem on Perseverance
Poems are a way to express feelings in the form of verse. Some poems are written in such a way that tells us where we are and wh...
Augustus Perez
These 13 Paintings Convey Deep Meanings In The Most Extraordinary Way
Pictures speak a thousand words for those who understand its language. But an art that depicts the same is rare to confront. Fre...
Swati Bhandari
Phoenix Bird And Its Popular Culture Adaptations
In Greek mythology, the Phoenix is a creature that resurrects from its ashes after it has ceased to exist in a show of flames. I...
Kevin Green